This site is a participant in the Amazon Services LLC Associates Program, an affiliate advertising program designed to provide a means for sites to earn fees by advertising and linking to Amazon.com. As an Amazon Associate, I earn from qualifying purchases at no additional cost to you, if one of my links is used.
When running a homelab with services that need to be accessed from the internet, reliability is key. That’s where having a small instance in the cloud comes in handy as a backup which is where we will implement an easy Cloudflare DNS Failover setup.
My site is typically served from a Proxmox Virtual Machine cluster running on a Beelink S13 Mini PC node, but home internet connections aren’t always 100% reliable.
I’ll have a post soon for scripting the synchronization of a WordPress site between two servers, which is the first step in implementing a true failover solution.
Why I Created This Failover Solution

To avoid the frustrating outages with my homelab setup, I decided to find a solution that wouldn’t break the bank. Like many self-hosters, I already use Cloudflare for DNS management and its security benefits, but I didn’t want to pay for their premium Load Balancing feature just for my personal projects.
The answer? A lightweight bash script that automatically monitors my main server and updates my DNS records when needed. This DIY approach gives me enterprise-like failover capability without the enterprise price tag. Best of all, it’s helped me achieve 99.8% uptime for my personal services, even with an occasionally unstable home internet connection.
While Cloudflare makes it easy to manually switch traffic between multiple servers, their automatic Load Balancing feature requires a paid plan. This post shows you how to create an automatic Cloudflare DNS failover system using a simple bash script running as a cron job.
How It Works
The script runs every 60 seconds and performs three main functions:
- Checks primary server health: It queries a health check URL on your main server. If the endpoint responds with HTTP 200, the primary is considered healthy.
- Determines current DNS configuration: Rather than relying on standard DNS resolution (which might return Cloudflare’s proxy IP), it queries Cloudflare’s API directly to get the actual configured IP for your A record.
- Updates DNS if needed: Depending on the health check results and current DNS configuration, it updates the Cloudflare A record to point to either the primary or failover server’s IP.
Benefits of This Approach
What I love about this solution is its simplicity and reliability. There’s no need for complex infrastructure or expensive cloud services—just a basic script running on your backup server for the Cloudflare DNS failover. The beauty is in how it leverages Cloudflare’s free DNS services and API capabilities to create a quick failover system.
Some key benefits I’ve experienced:
- Near-instant failover when my home internet has issues
- Automatic restoration when my primary server comes back online
- Minimal resource usage on my backup server
- Complete control over the failover logic
- No additional monthly costs
This approach has been particularly valuable for hosting my personal blog and a few small web applications that friends and family rely on. Let’s dive into the implementation details!
The Script
Here’s the complete script:
https://github.com/ncdavgreene/hosting-scripts/blob/main/failover.sh
Breaking Down the Cloudflare DNS Failover Script
Before you implement this solution, its helpful to know exactly how it works. Through trial and error this was pieced together, so I’ll walk through each component to save you time.
Understanding the Script Components
1. Global Variables and Configuration
The script starts by setting up important variables:
CF_API_KEYandCF_API_EMAIL: Your Cloudflare credentials – Here I’m using the Global API Key from Profile -> API TokensCF_ZONE_ID: The identifier for your domain zone in CloudflareCF_RECORD_ID: The specific ID of the DNS record you want to updateDOMAIN: Your domain nameMAIN_IPandFAILOVER_IP: The IP addresses for your primary and backup serversHEALTHCHECK_URL: The URL to monitor for determining if your primary server is healthyDNS_RESOLVER: Optional DNS resolver (I recommend using Cloudflare’s own 1.1.1.1)
Finding your Zone ID and Record ID might seem tricky at first. The easiest way is to log into your Cloudflare dashboard, select your domain, go to the DNS tab, and click on the “API” link in the right sidebar. This will show you the Zone ID.
For the Record ID, you can click on the “Edit” button next to your A record, and save without making any changes. Then visit your Cloudflare Audit Log and the edit action will have it.
The Audit Log can be found at https://dash.cloudflare.com/ -> Manage Account -> Audit Log.
There expand the recent Update action and Resource ID will be your record ID to use in the script.
2. Updating the DNS Record
The update_dns() function sends a PUT request to Cloudflare’s API to update your DNS record:
- It takes the new IP address as a parameter
- Constructs a properly formatted API request with your credentials
- Specifies the record type (A), name (your domain), content (the new IP), TTL (120 seconds), and whether to proxy through Cloudflare (true)
- Checks the API response for success or failure and logs accordingly
Important: For the Cloudflare DNS failover, the script is setup to update a single A record for @ and assumes you are using a CNAME for www. It can be updated to switch over any A record you want such as a subdomain or www A record instead if that’s how you roll.
3. Health Check Function

The check_health() function verifies if your primary server is operational:
- It uses an IP-pinned probe with curl to make an HTTP request to your health check URL, only to the primary server.
- Sets a 5-second timeout to prevent the script from hanging. If you have a slow HTTP response time, this may need adjusting.
- Returns 0 (success) if the server responds properly, or 1 (failure) if it doesn’t
- If your health endpoint is on port 80 (plain HTTP) just change :443: to :80: and the URL to http://.
4. Getting the Current DNS IP
The get_current_dns_ip() function retrieves the IP address currently set in your DNS record:
- Makes a GET request to Cloudflare’s API
- Extracts the IP address (content field) from the response
- Returns the current IP
5. Main Logic
The script’s main section ties everything together:
- Gets the current IP from your DNS record
- Checks if the primary server is healthy
- If the primary is healthy but DNS points elsewhere, it updates to point to the primary
- If the primary is unhealthy and DNS isn’t pointing to the failover, it updates to the failover
Setting Up the Health Check Endpoint in Nginx
For a quick and easy solution, add a dedicated health check endpoint to your Nginx configuration on only the main server for your chosen domain.
If you’re not using Nginx…why not!? I’m not certain how to implement this on Apache unfortunately as I haven’t touched it in many years. You could change the healthcheck_url to a static file which only exists on the main server instead of an endpoint I suppose.
location = /health {
    # Disable logging for health requests (optional)
    access_log off;
    # Return a 200 OK with a simple message
    default_type text/plain;
    return 200 "OK\n";
}
Then configure your HEALTHCHECK_URL to point to this endpoint.
Important: If you have a “cache everything” rule in Cloudflare, be sure to set an exclusion for /health to avoid cached responses, or pass a query parameter on the URL like ?nocache=123
Scheduling the Script
Set up a cron job on your failover server to run the script every 60 seconds:
- Edit your crontab:
crontab -e - Add this line:
* * * * * bash /path/to/cloudflare_failover.sh >> /path/to/log/cloudflare_failover.log 2>&1
Important: The user you create the cron under must have access to the paths above, or the cron/log will fail.
The script runs every 60 seconds, which is reasonable but could potentially generate a significant number of API calls to Cloudflare (though still well within free tier limits or 1200 per 5 minute period)
Real-World Cloudflare DNS Failover Results
I’ve been running this script for the past month on my own setup, and the results have been fantastic. What used to be 30+ minutes of downtime whenever my home internet had issues is now reduced to just under a minute before the failover kicks in.
My blog visitors and the friends who use any of my self-hosted services on this domain haven’t noticed any significant outages, even though my primary server has gone down a few times during this period. The script has silently redirected traffic to my small VPS in the cloud, and then back to my homelab once service was restored.
Here’s the quick‑and‑dirty test I ran, the exact commands I used, and the timeline of what happened.
The Test Harness
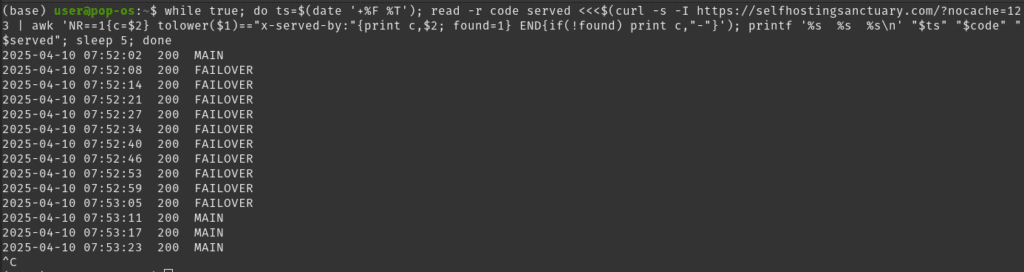
I fired up an infinite curl loop that hits the site every five seconds, prints the timestamp, the HTTP status code, and the custom X‑Served‑By header (set to either MAIN or FAILOVER on each backend).
while true; do
ts=$(date '+%F %T')
read -r code served <<<$(curl -s -I https://selfhostingsanctuary.com/?nocache=123 \
| awk 'NR==1{c=$2}
tolower($1)=="x-served-by:"{print c,$2; found=1}
END{if(!found) print c,"-"}')
printf '%s %s %s\n' "$ts" "$code" "$served"
sleep 5
done
What the one‑liner does
printf → logs timestamp · HTTP code · backend in one tidy rowcurl -s -I → silent, headers‑only requestawk → captures the first‐line status code and the X‑Served‑By header
Triggering the Fail‑Over
- 07:52:02 – Loop begins, requests are served by MAIN.
- I immediately stop Nginx on the primary server.
- The fail‑over script runs via cron every 60 s, detects the outage, and flips DNS to the standby host.
What We Learned
| Event | Time | Elapsed | Notes |
|---|---|---|---|
| First request on MAIN | 07:52:02 | – | Baseline |
| First request on FAILOVER | 07:52:08 | 6 s | DNS had already flipped (cron must have run almost immediately) |
| First request back on MAIN | 07:53:11 | 1 m 9 s | After I restarted Nginx, the next cron run detected recovery |
Key takeaways
- Fail‑over detection + DNS propagation took ~6 seconds.
That’s comfortably within a single browser refresh. - Recovery to primary took ~1 minute.
The script only polls once per minute, so this is expected. - The loop confirmed zero 5xx errors—clients were always served a valid page.
Next Steps
- Tighten the polling interval if you need sub‑minute recovery.
- Add health‑check endpoints to distinguish between Nginx crashes and upstream app issues.
- Consider weighted DNS records to bleed traffic back to the primary gradually.
Have a tweak or improvement? Drop it in the comments—always keen to shave a few more seconds off the fail‑over!
Frequently Asked Questions
Based on the questions I’ve received since implementing this solution:
Q: Can this work with multiple domains or subdomains? A: Absolutely! You’ll need to create separate instances of the script for each domain/subdomain, each with its own CF_RECORD_ID.
Q: Will this work with non-Cloudflare DNS providers? A: The script is designed specifically for Cloudflare’s API. Other providers have different APIs, but the concept could be adapted.
Q: How much does the cloud failover server cost? A: I use a small VPS that costs about $5/month. Since it only needs to handle traffic during outages, even the most basic cloud instance is usually sufficient.
Q: Does this affect my Cloudflare Workers or Page Rules? A: No, this script only modifies the A record for your domain. All other Cloudflare settings remain untouched.
Conclusion
This script provides a simple yet effective solution for automatically switching your site between servers when issues arise. It’s an excellent alternative to Cloudflare’s paid load balancing feature for homelab environments.
By running this script every minute on your failover server, you ensure minimal downtime if your primary server becomes unavailable. Once the primary server is back online, the script automatically switches back to it.
For self-hosting enthusiasts like myself, it represents the perfect middle ground between DIY simplicity and great reliability. If you’ve been frustrated by occasional downtime in your homelab setup, I highly recommend giving this solution a try.
Have you implemented a similar solution for your homelab? I’d love to hear about your experiences in the comments below! If you have any questions about setting this up or encounter any issues, feel free to ask, and I’ll do my best to help.